Quarkus Summary and trick
Best source of knowledge is reading the guides and the workshop.
Info
Updated 08/23/2023
Value Propositions
- Designed to run java for microservice in container and OpenShift: reduce start time to microseconds, and reduce memory footprint.
- Run native in linux based image, so most of the java processing is done at build time.
- Extensible components, very easy to add dependencies and hide plumbing code
- Easy to develop integration tests at API level
- Quarkus implements reactive programming with Vert.x
-
50% reduction in resources demand
- No need to retrain Java developer to nodejs
- Hot reload made developer flow faster: 20 microservices built per week.
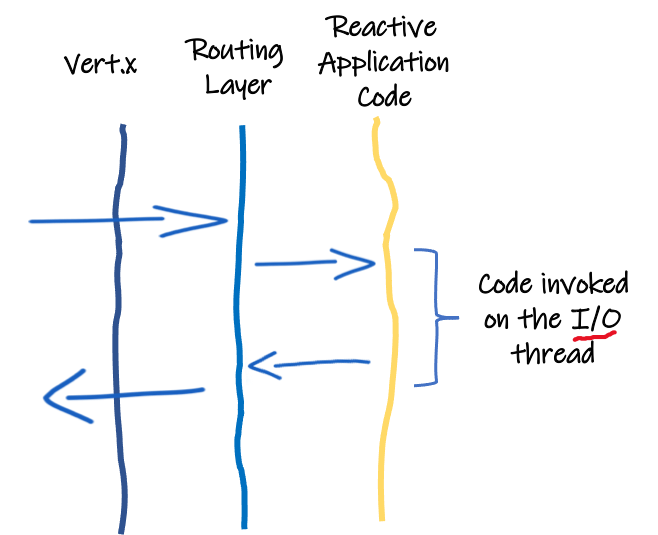
Quarkus HTTP support is based on a non-blocking and reactive engine (Eclipse Vert.x and Netty). All the HTTP requests your application receives, are handled by event loops (IO Thread) and then are routed towards the code that manages the request.
Getting Started
Quarkus CLI
Quarkus CLI lets you create projects, manage extensions and do essential build and dev commands using the underlying project’s build tool. It replaces the maven plugin. The CLI does not work on Java 1.8 so use sdk to change the SDK version.
Always use quarkus --help and quarkus --version to get the last updated CLI.
Here are some common commands:
# Create a project with groupId=com.foo, artifactId=bar, and version=1.0.0-SNAPSHOT
quarkus create app com.foo:bar

# List extension
quarkus ext ls

# Add extensions
quarkus ext add openshift qpid-jms resteasy-reactive smallrye-openapi smallrye-health quarkus-resteasy-reactive-jackson
# Build
quarkus build

quarkus dev
If the project could not be build because of missing maven wrapper use the following command:
Create a project
# new way with cli
quarkus create app  -x openapi,metrics,openshift,resteasy-reactive,resteasy-reactive-jackson ibm.gtm.dba:app-name:1.0.0
# old way
mvn io.quarkus:quarkus-maven-plugin:2.2.3.Final:create \
    -DprojectGroupId=ibm.gse.eda \
    -DprojectArtifactId=app-name \
    -Dpath="/greeting"
cd app-name
Package & run
Run with automatic compilation
quarkus dev
# build and  package
quarkus build
# older way
./mvnw compile quarkus:dev
# packaging
./mvnw clean package
# or for native
./mvnw clean package -Pnative
#  build with a docker build image
./mvnw package -Pnative -Dquarkus.native.container-build=true  -Dquarkus.container-image.build=true
For native build see QUARKUS - TIPS FOR WRITING NATIVE APPLICATIONS
Start and override properties at runtime:
for a native executable:
See the Building a native executable guide to develop with graalvm:
- Use Mandrel for java 11+ app, for linux OS
- Use Graalvm community edition for development JDK 1.8 Apps.
- Install native image with:
${GRAALVM_HOME}/bin/gu install native-image - To generate debug symbols, add
-Dquarkus.native.debug.enabled=trueflag when generating the native executable. - Run the tests against a native executable that has already been built:
./mvnw test-compile failsafe:integration-test - Build and deploy on OpenShift: add OpenShift plugin and do these steps.
Can also use environment variables: Environment variables names are following the conversion rules of Eclipse MicroProfile.
Debug within VSCode
Start debugger: shift -> cmd -> P: Quarkus: Debug current Quarkus Project to create a configuration.
Other Maven Quarkus CLI
# Run integration tests on native app
./mvnw verify -Pnative
# Generate configuration for the application
./mvnw quarkus:generate-config
Add capabilities
Useful capabilities:
older way
- Heath for liveness and readiness:
./mvnw quarkus:add-extension -Dextensions="smallrye-health" - Metrics for application monitoring:
./mvnw quarkus:add-extension -Dextensions="smallrye-metrics" - Use API over HTTP in the JSON format:
./mvnw quarkus:add-extension -Dextensions="resteasy-jsonb". - Openapi and swagger-ui
./mvnw quarkus:add-extension -Dextensions="quarkus-smallrye-openapi". Also to get the swagger-ui visible in "production" setquarkus.swagger-ui.always-include=truein the application.properties. - Kafka client:
./mvnw quarkus:add-extension -Dextensions="kafka" - Kubernetes to get the deployment yaml file generated
- Deploy to OpenShift using source to image
./mvnw quarkus:add-extension -Dextensions="openshift". See guide QUARKUS - DEPLOYING ON OPENSHIFT ./mvnw quarkus:add-extension -Dextensions="container-image-docker"-
Postgres hibernate reactive:
./mvnw quarkus:add-extension -Dextensions=reactive-pg-client,resteasy-mutinyThen see the REACTIVE SQL CLIENTS guide and the maas_backend project -
vert.x:
./mvnw quarkus:add-extension -Dextensions="vertx" - jib: to do container image build. See note here
./mvnw quarkus:add-extension -Dextensions="container-image-jib" - Kogito:
./mvnw quarkus:add-extension -Dextensions="kogito"
Docker build
# image name will be the name of the project in pom. build only
./mvnw clean package -Dnative -Dquarkus.container-image.build=true -Dquarkus.container-image.group=ibmcase -Dquarkus.container-image.tag=1.0.0
# and push it to repository:
./mvnw clean package -Dquarkus.container-image.build=true -Dquarkus.container-image.push=true
To avoid downloading all the maven jars while using a multistage Dockerfile and to keep the current executable started with quarkus:dev running on the same docker network as other dependent components, use a simple docker file for development that has java and maven:
FROM maven:3.6.3-jdk-11

COPY pom.xml /home/
COPY src /home/src/

WORKDIR /home

CMD ["mvn", "compile", "quarkus:dev"]
And then start it, by mounting the .m2 maven repository.
docker build -f Dockerfile-dev -t tmp-builder .
docker run --rm -p 8080:8080 -ti  -v ~/.m2:/root/.m2 tmp-builder
We can also combine this into a docker-compose file like in the eda item inventory project.
  maven:
    image: maven
    volumes:
      - "./:/app"
      - "~/.m2:/root/.m2"
    depends_on:
      - kafka
    hostname: aggregator
    environment:
      - BOOTSTRAP_SERVERS=kafka:9092
      - QUARKUS_KAFKA_STREAMS_BOOTSTRAP_SERVERS=kafka:29092
      - QUARKUS_PROFILE=dev
    ports:
      - "8080:8080"
      - "5005:5005"
    working_dir: /app
    command: "mvn quarkus:dev"
OpenAPI
Add the declaration of the Application api in properties. See this open API guide for configuration details.
%dev.mp.openapi.extensions.smallrye.info.title=Product Microservice API (development)
mp.openapi.extensions.smallrye.info.title=Product Microservice API
mp.openapi.extensions.smallrye.info.version=1.0.0
mp.openapi.extensions.smallrye.info.description=Just an example of kafka consumer and service
mp.openapi.extensions.smallrye.info.termsOfService=Demonstration purpose
mp.openapi.extensions.smallrye.info.contact.name=IBM Technical Asset and Architecture team
mp.openapi.extensions.smallrye.info.contact.url=https://ibm-cloud-architecture/refarch-eda
mp.openapi.extensions.smallrye.info.license.name=Apache 2.0
mp.openapi.extensions.smallrye.info.license.url=http://www.apache.org/licenses/LICENSE-2.0.html
Running on OpenShift
The guide is here and the main points are:
- The OpenShift extension is actually a wrapper extension that brings together the kubernetes and container-image-s2i extensions with defaults so that it’s easier for the user to get started with Quarkus on OpenShift
- Build is done by source 2 image binary build:
./mvnw clean package -Dquarkus.container-image.build=true. The output of the build is an ImageStream that is configured to automatically trigger a deployment -
The first time, build and deployment are done with the command:
./mvnw clean package -Dquarkus.kubernetes.deploy=true, after that, any build will trigger redeployment. Here are the steps done:- Build thin jar
- Contact kubernetes API server
- Perform s2i binary build with jar on the server. This adds a BuildConfig on the connected project.
- Send source code from local folder to OpenShift build container.
- Write manifest and signatures
- Generate Dockerfile and build the image on server
- Push image to private registry
- Apply the manifests: service account, service, image stream, build config, and deployment config as defined by the generated
openshift.yaml
-
Three pods are visible: build, deploy and running app.
# Remote build on OCP
mvn clean package -Dquarkus.container-image.build=true -Dquarkus.kubernetes.deploy=true -DskipTests
# example from store simulator with UI
mvn clean package -Dui.deps -Dui.dev -Dquarkus.container-image.build=true -Dquarkus.container-image.group=ibmcase -Dquarkus.container-image.tag=1.0.0 -Dquarkus.kubernetes.deploy=true -DskipTests
# Get image streams
oc get is
# From the created image
# Create an application in openshift- ex:
oc new-app --name=credit-application-mgr jb-credit-app/credit-application-mgr:1.0.0
See all the configuration parameters here.
Play with environment variables
-
To define environment variables, use config map:
- Add a config map with the variable name in the data filed as key. It follows the environment variable naming convention to overwrite quarkus' property. The config map can have multiple variables.
- To inject environment variables from config map add a property with the name of the config map.
-
Redeploy:
./mvnw clean package -Dquarkus.kubernetes.deploy=true
This will add the following declaration to the deploymentConfig:
- To add config map, secrets, we need the
kubernetes-configextension. See this guide, then declare properties in the following formats:
quarkus.openshift.env.configmaps=vaccine-order-ms-cm
quarkus.openshift.env.secrets=vaccine-order-secrets
quarkus.openshift.env.mapping.KAFKA_SSL_TRUSTSTORE_PASSWORD.from-secret=light-es-cluster-ca-cert
quarkus.openshift.env.mapping.KAFKA_SSL_TRUSTSTORE_PASSWORD.with-key=ca.password
quarkus.openshift.mounts.es-cert.path=/deployments/certs/server
quarkus.openshift.secret-volumes.es-cert.secret-name=light-es-cluster-ca-cert
That will generate the following spec:
   envFrom:
     - configMapRef:
       name: vaccine-order-ms-cm
     - secretRef:
       name: vaccine-order-secrets
   volumeMounts:
   - mountPath: /deployments/certs/server
     name: es-cert
     readOnly: false
     subPath: ""
 volumes:
     - name: es-cert
       secret:
         defaultMode: 384
         optional: false
         secretName: sandbox-rp-cluster-ca-cert
To change the value of a specific property in the application properties, we can use environment variables: The convention is to convert the name of the property to uppercase and replace every dot (.) with an underscore (_). So define a config map to define those environment variables in src/main/kubernetes folder.
Some reusable configuration
- To expose a route add:
- Set logging level
quarkus.log.console.enable=true
quarkus.log.console.format=%d{HH:mm:ss} %-5p [%c{2.}] (%t) %s%e%n
quarkus.log.console.level=DEBUG
quarkus.log.console.color=true
Remote dev mode
For running Quarkus app on OpenShift while developing locally so change done on code, pom.xml, properties are sent to the remote quarkus use the following settings:
See this guide section.
- Add in application.properties:
- set the environment variable QUARKUS_LAUNCH_DEVMODE=true
- start with
./mvnw quarkus:remote-dev -Dquarkus.live-reload.url=http://my-remote-host:8080
This is done via a HTTP based long polling transport, that will synchronize your local workspace and the remote application via HTTP calls.
Testing with Quarkus
Quarkus uses junit 5, and QuarkusTest to access to CDI and other Quarkus goodies. quarkus dev enables continuous testing, and understands what tests are affected by code changes.
See the test guide here.
With the dev console (/q/dev) offers access to the test UI. To test via HTTP, and rest-assured.
Here is an example for post testing:
TrainSearchRequest req = new TrainSearchRequest(); //...
Response resp = with().headers("Content-Type", ContentType.JSON, "Accept", ContentType.JSON)
          .body(req)
          .when().post("/consolidatorA")
          .then()
             .statusCode(200)
             .contentType(ContentType.JSON)
        .extract()
        .response();
        TrainSearchResponse searchResp= resp.body().as(TrainSearchResponse.class);
Other example on a Get
Response rep = given()
          .when().get(basicURL + "/names")
          .then()
             .statusCode(200)
             .contentType(ContentType.JSON)
        .extract()
        .response();
        String[] names = rep.body().as(String[].class);
        Assertions.assertNotNull(names);
        Assertions.assertEquals(3,names.length);
Application configuration will be used in any active profile. The built-in profiles in Quarkus are: dev, prod and test. The test profile will be used every time you run the @QuarkusTest.
@QuarkusTest helps to get the CDI working. But there is still an issue on inject properties that may not be loaded due to proxy instance creation. So in test class the properties need to be accessed via getter: For example to be sure the hostname is loaded from the application.properties do:
@ApplicationScoped
public class RabbitMQItemGenerator {

  @ConfigProperty(name = "amqp.host")
  public String hostname;
...

@QuarkusTest
public class TestRabbitGenerator {

    @Inject
    RabbitMQItemGenerator generator;

    ...
    Assertions.assertNotNull(generator.getHost());
Things to do:
- in the test class add @QuarkusTest
- inject the bean under test
- be sure to use the good version of maven-surefire
- set the java.util.logging system property to make sure tests will use the correct log manager:
<systemPropertyVariables>
    <java.util.logging.manager>org.jboss.logmanager.LogManager</java.util.logging.manager>
</systemPropertyVariables>
- Exposed port for tests are on port 8081 (can be changed via
quarkus.http.test-port=8083)
Integration test uses Rest-assured with API doc.
For testing body content, use the Hamcrest APIs. Example of not and containsString operators.
public void shouldNotHaveStore_7_fromGetStoreNames(){
        given().when().get("/names").then().statusCode(200).body(not(containsString("Store_7")));
    }
Maven profile and quarkus test
The properties can be prefixed with %staging or %prod or %dev to set those properties according to the deployment. If we use a custom prefix like staging then we need to run quarkus with a specific profile. For that set export QUARKUS_PROFILE=staging in your .env file.
By default, Quarkus tests in JVM mode are run using the test configuration profile
Vue app with quarkus app
See this separate note.
Reactive CRUD app with Postgres
- Add following to pom.xml
<dependency>
      <groupId>io.quarkus</groupId>
      <artifactId>quarkus-resteasy-mutiny</artifactId>
    </dependency>
    <dependency>
      <groupId>io.quarkus</groupId>
      <artifactId>quarkus-reactive-pg-client</artifactId>
    </dependency>
    <dependency>
      <groupId>io.quarkus</groupId>
      <artifactId>quarkus-hibernate-reactive</artifactId>
  </dependency>
- Annotate the entity with table and query
@Entity
@Table(name = "kafka_clusters")
@NamedQuery(name = "ClusterDetail.findAll", query = "SELECT k FROM kafka_clusters k ORDER BY k.name")
public class ClusterDetail {

    @Id
    @SequenceGenerator(name = "fruitsSequence", sequenceName = "known_fruits_id_seq", allocationSize = 1, initialValue = 10)
    @GeneratedValue(generator = "fruitsSequence")
    private Integer id;
Command mode application
Develop command mode applications that run and then exit, like a java main method.
For that implement QuarkusApplication and have Quarkus run this method automatically
@QuarkusMain
public class CommandModeApp implements QuarkusApplication {

    @Override
    public int run(String... args) throws Exception {
        System.out.println("Hello from mars");
        return 10;
    }
A @QuarkusMain instance is an application scoped bean by default.
For a Java main app
@QuarkusMain(name: "kbMain")
public class JavaMain {

    public static void main(String... args) {
        Quarkus.run(HelloWorldMain.class, args);
    }
}
Dev mode works the same.
Then mvn package and run it with java -jar target/....-runner.jar
When running a command mode application the basic lifecycle is as follows:
- Start Quarkus
- Run the QuarkusApplication main method
- Shut down Quarkus and exit the JVM after the main method returns
It is possible to have multiple main methods in an application, and select between them at build time. The @QuarkusMain annotation takes an optional 'name' parameter and the name is used with -Dquarkus.package.main-class="kbMain". If the app needs arguments, pass them with -Dquarkus.args=.
Development practices
Configuration
application.properties content is injected with code like:
    @ConfigProperty(name="temperature.threshold", defaultValue="2.5")
    public double temperatureThreshold;
Quarkus does much of its configuration and bootstrap at build time. But some properties are defined at run time from system properties, environment variables (in uppercase, . transformed as _ : QUARKUS_DATASOURCE_PASSWORD), using .env file, and then application.property in a $(pwd)/target/config folder for development test.
// does fail as it return -
Assertions.assertEquals(2.0, assessor.temperatureThreshold);
// while this works!
Assertions.assertEquals(2.0, assessor.getTemperatureThreshold());
The content can be combined with environment variables See this section in quarkus guide
Also you can access the configuration programmatically. It can be handy to achieve dynamic lookup, or retrieve configured values from classes that are neither CDI beans or JAX-RS resources. See this paragraph
String databaseName = ConfigProvider.getConfig().getValue("database.name", String.class);
Optional<String> maybeDatabaseName = ConfigProvider.getConfig().getOptionalValue("database.name", String.class);
Quarkus supports the notion of configuration profiles. These allow you to have multiple configuration in the same file and select between them via a profile name.
See also Using Property Expressions
Get access to start and stop application events
This is an important practice when we want to start a listener on Kafka topic for example or a kafka stream topology.
import javax.enterprise.event.Observes;
...
 void onStart(@Observes StartupEvent ev){}

 void onStop(@Observes ShutdownEvent ev) { }
Testing with Moquito
Declare the beans to Injected in the Test class. Then a static method to create and moquito them. See this quarkus blog
 JMSQueueWriter mockJMSWriter = Mockito.mock(JMSQueueWriter.class);
        Mockito.when(mockJMSWriter.sendMessage(any(),anyString())).thenReturn("Success");
        QuarkusMock.installMockForType(mockJMSWriter, JMSQueueWriter.class);
Reactive with Mutiny
Mutiny is a reactive programming library to offer a more guided API than traditional reactive framework and API. It supports asynchronous, non-blocking programming, streams, event driven, back-pressure and data flows and only two types to manage asynchronous actions (Uni and Multi).
Quarkus uses an event-loop to implement the reactive mode, based on Vert.X as reactive engine. To program with reactive or imperative, we use different APIs. Mutiny is such API.
To asynchronously handle HTTP requests, the endpoint method must return a java.util.concurrent.CompletionStage or an io.smallrye.mutiny.Uni or io.smallrye.mutiny.Multi(requires the quarkus-resteasy-mutiny extension).
With Mutiny both Uni and Multi expose event-driven APIs: you express what you want to do upon a given event (success, failure, etc.). These APIs are divided into groups (types of operations) to make it more expressive and avoid having 100s of methods attached to a single class.
This section of the product documentation goes over some examples on how to use Uni/ Multi.
Here are some basic examples:
- Support asynchronous REST end point
    @GET
    @Produces(MediaType.APPLICATION_JSON)
    @Path("/json/{id}")
  // producing generic json object
  public Uni<JsonObject> getJsonObject(@PathParam String id){
        JsonObject order = new JsonObject("{\"name\": \"hello you\", \"id\": \"" + id + "\"}");
        return Uni.createFrom().item( order);
    }

    // Producing a bean
    @GET
    @Produces(MediaType.APPLICATION_JSON)
    @Path("/order/{id}")
    public Uni<Order> getOrderById(@PathParam String id){
        Order o = new Order();
        o.deliveryLocation="Paris/France";
        o.id=id;
        return Uni.createFrom().item(o);
    }
-
Calling an external service
- Create an interface about this service
- Call the service and use the different event to process success and failure
-
Processing data as stream:
-
Create a multi from a list and send to kafka
  @Inject
  @Channel("items")
  Emitter<Item> emitter;

 Multi.createFrom().items(buildItems(numberOfRecords).stream())
                .subscribe().with( item -> {
                    logger.warning("send " + item.toString());
                    //KafkaRecord<String, Item> record = KafkaRecord.of(item.sku,item);
                    CompletionStage<Void> acked = emitter.send(item);
                    acked.toCompletableFuture().join();
                    },
                    failure -> System.out.println("Failed with " + failure.getMessage()));
Events won’t begin flowing through the data streams until a subscriber requests them.
Reactive messaging
Content built from Quarkus guide and Clement Escoffier's book.
For a quick review of a reactive messaging guide search reactive messaging Quarkus tutorial is here
See also this article for reactive programming and system summary.
Quick summary:
- Reactive Messaging integrates with various messaging technologies, such as Apache Kafka, AMQP, and others...
- Add extension:
quarkus ext add smallrye-reactive-messaging-kafka - No need to start a Kafka broker when using the dev mode or for tests. Quarkus starts redpanda container and apicurio if using schema
- Define an application scoped bean for your service. See code template in eda-quickstarts/quarkus-reactive-kafka-producer
@ApplicationScoped
public class OrderService {
    @Channel("orders")
    public Emitter<OrderEvent> eventProducer ;

    public OrderEntity createOrder(OrderEntity order){
      OrderEvent orderEvent = OrderEvent.from(order);
      eventProducer.send(orderEvent);
    }
- define channel properties in
application.properties.
mp.messaging.outgoing.orders.connector=smallrye-kafka
mp.messaging.outgoing.orders.topic=orders
mp.messaging.outgoing.orders.value.serializer=io.quarkus.kafka.client.serialization.ObjectMapperSerializer
# automatically register the schema with the registry, if not present
mp.messaging.outgoing.orders.apicurio.registry.auto-register=true
-
On the consumer side, use
@Incomingannotation with channel name on top of function to process the message from kafka -
Use Kafka connector:
mp.messaging.incoming.[channel-name].connector=smallrye-kafka -
Implement Deserializer using Jsonb or Jackson. See this section.
-
When using Avro and Apicurio schema registry then the deserializer needs to be
io.apicurio.registry.utils.serde.AvroKafkaDeserializerBut with Quarkus 2.5 the deserializer and serializer are set by default.
mp.messaging.incoming.shipments.value.deserializer=io.apicurio.registry.utils.serde.AvroKafkaDeserializer
mp.messaging.incoming.shipments.apicurio.registry.url=${SCHEMA_REGISTRY_URL}
mp.messaging.incoming.shipments.specific.avro.reader=true
mp.messaging.incoming.shipments.apicurio.registry.avro-datum-provider=io.apicurio.registry.utils.serde.avro.ReflectAvroDatumProvider
mp.messaging.incoming.shipments.apicurio.registry.as-confluent=true
Nice cheat sheet to combine Mutiny, Reactive messaging.
- It is possible to combine imperative and reactive: so on a POST api, the code emits event to Kafka. We just need to inject an emitter as below:
Emitting Kafka Records will duplicate the payload.
{"headers":{},
"key":"Item_4",
"metadata":{},"partition":-1,
"payload":{"id":296,"price":72.9,"quantity":7,"sku":"Item_4","storeName":"Store_2"}}
To send directly the payload with a key, use a Message instance.
Apache Kafka specific for reactive messaging
The Kafka Connector is based on the Vert.x Kafka Client.
A case for Kafka to SSE
A nice capability is to open a Server Side Event end point (see code in freezer mgr project):
In the API resource class:
    @Inject
    @Channel("internal-alert-stream")
    Publisher<ReeferAlert> alerts;

    @GET
    @Path("/alerts")
    @Produces(MediaType.SERVER_SENT_EVENTS)
    @SseElementType(MediaType.APPLICATION_JSON)
    public Publisher<ReeferAlert> streamAlerts(){
        return alerts;
    }
In the service class, the incoming channel is connected to Kafka and the outgoing is an internal channel to broadcast message to it.
    @Incoming("reefer-alerts")
    @Outgoing("internal-alert-stream")
    @Broadcast
    @Acknowledgment(Acknowledgment.Strategy.PRE_PROCESSING)
    public ReeferAlert process(ReeferAlert inAlert){
        // process the alert and generate the message to broadcast to SSE
        return inAlert;
    }
REST Client
- Install client jars
- Add an interface
Adopting Vertx
Quarkus is based on Vert.x, and almost all network-related features rely on Vert.x / Netty. Every IO interaction passes through the non-blocking and reactive Vert.x engine. The (Vert.x) HTTP server receives the request and then routes it to the application. If the request targets a JAX-RS resource, the routing layer invokes the resource method in a worker thread and writes the response when the data is available. But if the HTTP request targets a reactive (non-blocking) route, the routing layer invokes the route on the IO thread giving lots of benefits such as higher concurrency and performance.
To fully benefit from this model, the application code should be written in a non-blocking manner.
Add the extension: ./mvnw quarkus:add-extension -Dextensions="vertx". Get access to Vert.x via injection:
When using the Mutiny API to program in reactive approach, then the Vert.x package is io.vertx.mutiny.core.Vertx.
Typical problems
Running cloud native
By default, when building a native executable, GraalVM will not include any of the resources that are on the classpath into the native executable it creates. Resources that are meant to be part of the native executable need to be configured explicitly.
Run quarkus test with external components started with docker compose
The best approach is to avoid using docker-compose for development and use TestContainer.